Monday, September 26, 2016

A Hot Time

Being the 2nd Part of Sir Rudy's Adventures

After defeating the evil wizard, Sir Rudy departed on a pilgrimage to the shrine of St. Oswald. Despite the delays arising from his garrulous companions, our hero led a group of pilgrims past scenes of battle and bandit-infested woods. At the shrine, Rudy's wounds were healed.

Refreshed, Sir Rudy continued his travels. He arrived at an inn where he hired a warrior named Mordret. From there, he was challenged by a recreant knight in black armor. Rudy defeated him relatively easily. The shaken knight fell to his knees and begged for quarter. Rudy relented, although he required the knight to deliver himself to King Arthur and pledge his fealty.

As he proceeded on his travels, Sir Rudy encountered a villages stricken by poverty or plague. Touched by their plight, Rudy tried to help. Alas, they were not sufficient to alleviate all the villages' needs. He also came down with the plague and took some time to recover. At least, Sir Rudy reflected, he was able to do a little to help. In another village, angry peasants challenged Sir Rudy. He gave them the Unicorn Horn and won their respect.

Rudy and his companions also faced deadly challenges. One night, three hell hounds attacked. Rudy was wounded but the heroes killed the beasts. Another time they were ambushed by bugbears. These too were defeated, although the enemy killed Rudy's retainer, Edric. Rudy and Mordret also ran afoul of 3 ogres, who wounded Mordret before they were slain.

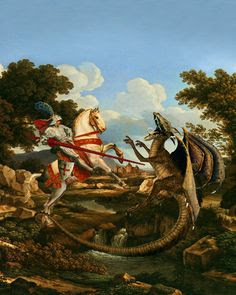
But Sir Rudy's biggest challenge came one day when the heroes discovered a smoking cave. Rudy peered in then ducked away as a massive beast charged forth.


A dragon!

Rudy charged, skewering the beast with his lance. The lance broke and the dragon soared by, gashing Rudy with its talons. Again it swooped. Rudy ducked and slashed with his sword, wounding the beast again. This time the dragon opened its mouth and belched flames, which licked about Rudy. He could feel his armor heat up and his skin burn. Yet Rudy fought on, scoring another couple of hits. Blood gushed from the wounded beast. With its last reserves of strength it flew away in a panic.

Sir Rudy was disappointed that he could not finish off the spawn of Satan. Yet he rejoiced when he searched the lair. Amidst a pile of coins and jewels, he discovered a an exquisite, magical sword. Its marking revealed it to be the Sword of the Fisher King! Rudy also discovered a human tooth.When he picked it up, Rudy could feel a surge of holy power. Clearly it was a relic, perhaps the tooth of St. Oswald himself!

Sir Rudy was pleased with his successes. He could feel his prowess increasing. Yet he felt no nearer to the Holy Grail. Would he ever find it?

Find out in future episodes of Sir Rudy's Tale


Sunday, September 11, 2016

Sinister Sorcery

Another Knight of Destiny Adventure
Part 1 of Sir Rudy's Quest

Sir Rudy is another knight of Arthur's court that has taken on the Quest for the Holy Grail.

As he wandered through the countryside, he comforted a mortally wounded paladin and defeated a band of vicious dwarves. He then found an inn where he hired a merchant named Edric to manage his supplies.

He was about to leave the inn when a young, crying maiden ran up to him. She told Rudy how an evil wizard, Laamorz, had holed up in a nearby tower and was demanding tribute from the village. She heard a rumor that the wizard wanted her as the next tribute!

Incensed, Rudy pledged to end the wizard's reign of terror. He rode to the tower where he confronted Laamorz. The wizard just scowled and then launched a fireball at him! Rudy blocked it with its shield and then rushed his enemy. He managed to get in a few strikes, none fatal. Laamorz retreated to his tower with Rudy in hot pursuit. A fireball struck the paladin; Rudy could feel his skin cooking with the heat, but he did not relent. At the top of the tower, Rudy cornered Laamorz. He offered the wizard a chance to yield, but the magician launched another fireball. Rudy charged and put an end to Laamorz.


Tentacle, Tentacle, Tentacle

The Conclusion of A Can of Worms - A Kate and Kip Adventure

Kate and Kip's ambush worked. They defeated the worms and were able to move deeper into the sewers.

Finally, deep in the heart of the sewers, they discovered a large tentacled creature protected by worms and a slime.

The worms rushed them and spewed acid. Kate and Kip dodged, then blasted the worms.

The slime came racing at them but Kip blasted it.

Our heroes began moving into the room. Kip shot the tentacled thing. It retaliated by spitting a gob of acid that hit Kate. She cried out in pain as acid burned her flesh.

Nevertheless, she moved forward to the railing. This time, the monster missed. The diversion gave Kip a chance to move behind some cover.

The thing turned its attention on Kip. Fortunately he found cover; the acid splashed against the barrel. Kip returned fire and seared the creature.

Kate found cover and fired. Her shot missed. The thing spat at Kip; once again the barrel protected him. His return shot was accurate, blasting into the thing and finally killing it.

With the tentacled thing's demise, Stargaze City has been saved!

Saturday, September 10, 2016

Ambush!

Part 4 of A Can of Worms - A Kate and Kip Adventure


Driven back by a swarm of worms, Kate and Kip retreated to the pumping station and took up defensive positions. Given a brief respite, they treated their wounds, although Kate was still suffering.

One of the worms emerged. Kip missed but Kate blasted it!

A second emerged. This time Kip did not miss!

Then the third. Again, it was up to Kate to win the day!

The path is now open to the bowels of the sewers, wherein lays the heart of the mystery. What will they find there?

Tune in next time!