Friday, December 30, 2016

Temple of the Rat God

A Khamen and Candorra Adventure

After being released from prison, Khamen accompanied the priest and Candorra to the Temple. There, the priest briefed the pair. Cultists of the Rat God had stolen the Tooth of St Celene, a sacred relic. It was being held in a reliquary within the Rat God's Temple. Khamen was to sneak into the temple, find the box, and retrieve the relic. Succeed and he would be free; fail and he would find the freedom of death. What of Candorra? She was there to keep Khamen to his task.

The duo traveled to Talmatia, the city of sin, where every manner of vice and corruption prevailed. In this bustling miasma, the Cult of the Rat God thrived and its heathen temple stood proudly.

As night fell, two cloaked individuals slid through the shadows and up the stairs to the entrance of the temple.
A schematic of the Temple
The doors were open and no guards were posted but the duo cautiously entered the foyer (1). There was no door forward so they had to choose another route. Heading right, they entered a room (2) filled with bones. As soon as they entered, the bones magically joined together and a half dozen skeletal rats attacked. They leapt upon the heroes; two bit through their armor. A few choice slashes decapitated half of the skeletal beasts and the others fled.

Finding a dead end, the duo backtracked and entered a room (3) where three priests were engaged in an arcane ritual. Khamen signaled to Candorra to creep quietly past them. 

Game Note: I introduced a mechanic where the characters can try to sneak past the enemy. They need to roll the enemy's level or higher. Rogues get a +1 modifier. If any character fails, the party is spotted.

But as they made the attempt, Candorra kicked a loose pebble. Alerted, the priests attacked. Khamen killed one, but another slashed him. Stumbling back, Khamen made a perfect target. The priest charged forward, but Candorra rushed up, slashed him, spun and parried another attack, and then cut down the remaining priest.

As Candorra bandaged Khamen, he said "I thought you were good at this."

Scowling, she replied, "What are you talking about? I just took out two of them."

"I meant sneaking. Your clumsiness alerted them."

Candorra grew flushed. She tried to stammer a retort but just ended up huffing. Khamen winced as she tightened the bandage a little too vigorously.

In the next room (4), they ran into a horde of rats. Again, Khamen was bitten, but at least the wound did not fester.
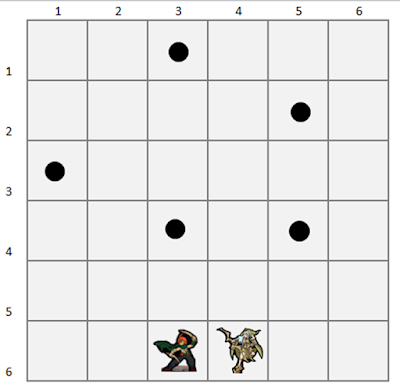
An example of my virtual battle board.
The black dots represent rats.

Next (4) they passed a gem-encrusted statue of a large humanoid rat. Khamen hesitated and approached the statue.

"Don't even think about it." Candorra commanded.

Khamen withdrew his hand and headed for the door.

Game Note: Given the nature of the quest, I would choose not to touch the statue (especially because I know it could turn into an enemy) but I figured that Khamen would be tempted. Therefore, I had the characters make a Level 3 willpower roll.

At the door they could hear voices from the other side (6). Cautiously, they opened the door. Four cultists were worshiping at a blood-stained altar. They tried to sneak by but this time Khamen made a noise. The cultists turned and attacked, wielding bloody curved daggers. Each of the heroes took a wound before they dispatched two of the enemy. The others fled.

Another battle board.
This time the token represent cultists
As they left the room, Candorra stated, "I thought you were good at this." Khamen just scowled.

The next room (7) was an armory. Passing through, they turned left and entered a dark room (8) with a throne on a dais. As soon as they entered, a shadowy humanoid figure on the throne stirred.

"Who dares enter my presence?" called the figure. A light shone on its face; they could see the visage of a large rat!

Khamen started to raise his sword but Candorra stopped him. She fell to her knees, pulling Khamen after her.

"Please Lord! We mean no disrespect. We have lost our way. We have sacrifices for your altar.

The rat king stared its beady eyes at them. Then it snarled and ordered "Begone! And disturb me no more!"

With that, the heroes scurried out of the room.

Game Note: I rolled "bribe" for the rat king's reaction. The problem is that I'm not tracking cash! Instead of a bribe, I allowed them to make a persuasion roll (vs. the enemy's level). Candorra passed, and momentarily appeased the king.

Finally, they found the reliquary room (9). Along the rear wall was the object of their search - a large box-like structure covered with grotesque, gilded ornamentation. Khamen began to fiddle with it. He sprung one lock, then another. As he experimented with the final lock, there was a frightening buzz. Suddenly, he felt a shock run through his body. He fell to the floor.

At that very moment, the door behind them opened. In strode a rat-headed humanoid, a large scimitar in its grasp. As soon as it saw the duo, it charged. Its attack was clumsy, however. Candorra easily ducked the slash and drove her sword into its vitals.

"Hurry!" she hissed. "Open that last lock and let's go!"

"I can't" Khamen stated, his teeth still chattering from the shock. As she looked at him, he held up his trembling hand.

"Tell me what to do and I'll be your hands." she responded.

He gave her instructions and she managed to open the last lock.

Game Note: Due to his wounds, I was worried about Khamen making the last roll (which was initially a puzzle box) so I had Candorra do it. I modified and embroidered the story a bit.

"At least I'm good at something." she jested as she pulled out the stolen Tooth. Wrapping it up carefully, she placed it in her pouch. Then she helped Khamen to his feet. Together, they stumbled back through the temple. Fortunately, they were not challenged and were able to sneak out into the Talmatian night.

Thursday, December 29, 2016

Khamen's Recruitment

Introduction to a New Four Two* Against Darkness Series

Khamen was lying upon a moldering heap of rags in the dank, gloomy cell. "Well, this is quite a fix you got yourself into," he thought to himself. He should have known better than to try to burgle the home of the captain of the City Watch. But the old man who hired him was willing to pay a pretty penny for that jeweled dagger. Khamen could not resist the offer.

As he pondered his tribulations, Khamen heard the clank of a gate and the echoes of footsteps along the corridor. From the sound, Khamen could tell that two men were approaching. Soon, the flicker of torchlight reached into his cell. The jailer opened the cell door and stepped aside. A man in white priestly robes stood there, gazing upon Khamen. He then turned to the guard and with a gesture dismissed him. The guard hesitated, started to protest, but then thought better of it and retreated instead.

"Am I to be shriven of my sins before my execution?" Khamen muttered sardonically.

"On the contrary," replied the priest. "I am here to offer you a chance for absolution."

Khamen sat up, then suspiciously answered, "How?"

"We hear that you are skilled at . . .acquiring things. There is something that the Temple wants to acquire. We believe you can assist us."

"And what do I get in return?"

"Out of here," the priest replied as he waved his hand about, indicating the cell.

"That's it?"

"Is that not enough?" The priest shook his head as if disappointed. "Ah well. The Temple will need to find another, and you can stay here." The priest turned to go.

"Wait!" called Khamen. "I'll help."

"Then come with me."

Khamen leapt up and followed the priest. As he started down the corridor, he collided with a hooded and cloaked figure that was waiting unseen. Khamen jerked with surprise; he could have sworn that only two men came down the corridor.

"Wha . . ?" began Khamen.

The priest turned his head and answered. "That is Candorra. As you can see, or perhaps it is better to say you cannot see, she excels at silent moving and hiding. She is to be your partner."

Khamen halted and firmly stated "I work alone."

"Ah," the priest answered in that smug tone that was beginning to irritate Khamen. "Well that is not possible. You are not entirely trustworthy, you see. If Candorra is unacceptable, you will need to return to your cell."

"Wait!" Khamen pleaded, waving his hands in supplication. "I may have been hasty . . ."

"Fine," the priest replied. "Come along; there is no time to waste."

Khamen hurried after the priest, with the figure of Candorra following ominously behind.

* OOC Game Notes

  • I wanted to run another dungeon as an experiment but I haven't completed Rowan's next adventure. I thought about using Maudicor but he is a higher level than I wanted. Ultimately, I decided to start new characters. Thus I present the story of Khamen and Candorra.
  • I am experimenting with 2-character adventuring parties (hence the reference to Two Against Darkness). When I ran Khamen and Candorra's first adventure, I halved the enemies and gave them a couple of healing potions.
  • Not surprising, Khamen is a rogue. Candorra is an elf. I used the character classes as is, although the Temple gave each character a potion of healing.

Saturday, December 24, 2016

The Tomb of An-Makeran

Part 1 of the Quest for the Book
A Rowan Adventure

After defeating the goblins, Rowan and Jacor are given a more difficult task. The Book of the Saints has been stolen by demon-worshiping fanatics. The culprits have fled to the trackless deserts far to the south, in the land of Palmeria. Our heroes must track them down.

Their first quest is to search for clues in the Tomb of An-Makeran. One problem - legend has it that his corpse rises from his sarcophagus and prowls the ancient tomb.

After a long journey, they arrive at the Tomb.

A rough map of the Tomb
The heroes' path is in red
They enter a long, broad corridor (2). In niches along the wall are the skeletal remains of temple guards. As soon as our heroes enter, the skeletons animate and attack. Jacor finds himself surrounded and takes a wound before Rowan saves him.

The next room (5) features a blood-stained altar. Rowan is stricken by a wave of weakness, but Jacor blesses him and the feeling passes. The heroes exit a door on the right (6) and encounter a temple priest. He attacks but our heroes dispatch him quickly.

They return through the altar room and exit left (4). They are suddenly attacked by a group of hyena-men. Jacor uses the power of the "Peace of Heaven" [aka sleep] to take out one hyena-man but the others swarm our heroes, wounding each of them. Rowan soon mows through the enemy.

In the next room (7), they find an emaciated figure that they take to be a corpse, until it speaks to them. "Brothers, your path is difficult. Allow me to help." It is a hermit who provides healing for Jacor.

In following rooms, they discover a clue (8)  - an ancient parchment - and accept a quest from a troubled spirit (9). Then they get swarmed by a pack of giant rats (12). Jacor uses "Peace of Heaven" to placate the beasts. They battle more skeletons (11), with Jacor taking a wound. After healing, they enter the last room (10).

In the center of the room is a sarcophagus. As soon as they enter, it opens and a mummy crawls out. It is An-Makeran!


Rowan rushes to engage but his attack misses. His shield blocks the mummy's counter. Jacor then hits the creature twice with the Holy Smite [lightning bolt] power. The mummy disintegrates.

The mummy is destroyed and the clue is in their hands, but they accepted a quest to clear all evil from the temple. They check the remaining rooms - there is one more monster (1) but it is a tough one, a chimera!

Jacor heals himself and Rowan, then they burst into the room. The beast's dragon head breathes fire, scorching our heroes. Jacor has no more power so he attacks with his staff, and actually manages to get a hit. Rowan uses his shield to block the beast's attacks, and he manages to get in a couple of solid hits. The wounded beast flees!

With the Tomb cleansed and this part of the quest complete, the duo head for the city of Alatar. There, they can recover their strength and find a sage who can unravel the mystery of the clue they found!

Game Notes
I played this adventure using my card-based modifications for Four Against Darkness. Read more here.

Friday, December 9, 2016

A Sad End

Being the 3rd Part of Sir Rudy's Adventures
(A Knight of Destiny Adventure)


Sir Rudy's elation at defeating a dragon and finding the Sword of the Fisher King were short-lived. Weakened by his wounds, he collapsed with the Sword in his hand. His companion, Mordret, tended to his wounds. Sir Rudy clearly needed rest so Edric bundled the unconscious knight onto a horse and took him to a nearby inn.

Sir Rudy rapidly healed but he was impatient to continue his quest. Despite Mordret's pleadings, our hero rose from bed determined to press forward. As he rode into the wilderness, he found a wounded paladin.

"Who did this?" Rudy asked.

The dying knight croaked out "Sir Turquine" just before he expired.

Rage filled Sir Rudy's breast. He would make Turquine pay for this outrage!

Rudy started to follow the signs of Turquine's passage, determined to catch the recreant knight. After several days, Rudy stopped near a placid lake. Suddenly, a bright light shone and ethereal music filed his ears. Seemingly out of the lake itself, a grand castle appeared. The Grail Castle!

The drawbridge opened and a shining knight strode forward. The figure spoke to Rudy. "Art thou worthy?"

"Yes!" Rudy boldly proclaimed.

"Look into thine heart. Does thou find hatred there?"

Rudy's face suddenly lost all color. He sank to his knees and began to weep, for he knew that his bold declaration was false.

The shining knight spoke again. "Cleanse thyself and return when thou art worthy." And with that, the knight and the castle disappeared like a mist dissipating in the morn.

Sir Rudy rode on pondering his failure and determined to confess his sin with the next priest. Suddenly, a figure on horseback appeared on the road.

"Another of Arthur's paltry minions. Prepare to die!"

Rudy could recognize the coat of arms. It was Turquine! With a roar of defiance, Rudy spurred his horse and leveled his lance. Turquine did likewise. The two collided with a loud crash. Both flew from their mounts.but they rose, drew their swords, and rushed at each other.

Turquine dealt a number of severe blows to Rudy. Blood gushed from numerous cuts. Rudy could feel his lifeblood and his energy waning away. Yet Rudy refused to yield to the evil foe. He fought back, striking a series of telling blows in succession. He battered Turquine to his knees.

"Yield, you miscreant, and I shall spare thy life." Rudy offered.

Turquine just sneered and leapt from his feet. Rudy dodged and landed a counter on Turquine. Turquine stumbled; Rudy followed and struck another blow. But before Rudy could strike again, Turquine disengaged.

Now both warriors circled each other warily. Their many wounds spouted blood; they only had enough strength for one final pass. Rudy spotted an opening. He lunged, and slipped on a patch of bloody soil. He fell to the ground, losing his grip on his sword. Turquine shuffled over to him and thrust his blade through Rudy's neck.

"Another paladin down." Sir Turquine growled as he stumbled to his horse, mounted, and rode off.

Notes

  • I modified the events slightly for narrative coherence. For example, the game did not tell me that Sir Turquine killed the paladin that Rudy found. Instead, it made sense based on later evens.
  • I made a big mistake in this session. I could have chosen to go on a pilgrimage but opted to confront a challenger instead. By ill luck, I ended up fighting Turquine.
  • Nevertheless, I nearly had him. Both were down to 1 life and Rudy had the initiative. Naturally, I rolled a 1 for his attack. Turquine's attack was far more effective.

Sunday, November 13, 2016

Asteroid Investigation

Part 1 of the Zirconian Intervention

When the Dominion invaded the neutral human planet of Zirconia, the Federation sent agents to the planet in an effort to gather intelligence and aid the human defenders.

Our heroes Kate and Kip have been landed on an asteroid within the Zirconian system. They are investigating strange transmissions from the asteroid.

As they explore, the discover a series of beacons on the asteroid's surface. Alas, the beacons are guarded by robot soldiers.

A general firefight ensues.

Kip destroys one of the robots.

Then he makes a break for one of the beacons, taking a hit on the way. Meanwhile, one of the robots has chased down Kate and is trying to grapple her.

Despite another wound, Kip reaches one of the beacons. It's a decoy! Kate is in trouble as the robot has her in its clutches.

She manages to get her pistol free. She blasts the 'bot. Another circles behind her. Badly wounded, Kip seeks cover in the rocks, and manages to eliminate another robot.

Kip blasts another robot. However, the one behind Kate shoots her down.

Its back is turned on Kip. He wastes no opportunity and blasts the robot.

With the guards out of the way, Kip is able to find and deactivate the real beacon. He then tends to Kate until a shuttle picks them up.

Monday, September 26, 2016

A Hot Time

Being the 2nd Part of Sir Rudy's Adventures

After defeating the evil wizard, Sir Rudy departed on a pilgrimage to the shrine of St. Oswald. Despite the delays arising from his garrulous companions, our hero led a group of pilgrims past scenes of battle and bandit-infested woods. At the shrine, Rudy's wounds were healed.

Refreshed, Sir Rudy continued his travels. He arrived at an inn where he hired a warrior named Mordret. From there, he was challenged by a recreant knight in black armor. Rudy defeated him relatively easily. The shaken knight fell to his knees and begged for quarter. Rudy relented, although he required the knight to deliver himself to King Arthur and pledge his fealty.

As he proceeded on his travels, Sir Rudy encountered a villages stricken by poverty or plague. Touched by their plight, Rudy tried to help. Alas, they were not sufficient to alleviate all the villages' needs. He also came down with the plague and took some time to recover. At least, Sir Rudy reflected, he was able to do a little to help. In another village, angry peasants challenged Sir Rudy. He gave them the Unicorn Horn and won their respect.

Rudy and his companions also faced deadly challenges. One night, three hell hounds attacked. Rudy was wounded but the heroes killed the beasts. Another time they were ambushed by bugbears. These too were defeated, although the enemy killed Rudy's retainer, Edric. Rudy and Mordret also ran afoul of 3 ogres, who wounded Mordret before they were slain.

But Sir Rudy's biggest challenge came one day when the heroes discovered a smoking cave. Rudy peered in then ducked away as a massive beast charged forth.


A dragon!

Rudy charged, skewering the beast with his lance. The lance broke and the dragon soared by, gashing Rudy with its talons. Again it swooped. Rudy ducked and slashed with his sword, wounding the beast again. This time the dragon opened its mouth and belched flames, which licked about Rudy. He could feel his armor heat up and his skin burn. Yet Rudy fought on, scoring another couple of hits. Blood gushed from the wounded beast. With its last reserves of strength it flew away in a panic.

Sir Rudy was disappointed that he could not finish off the spawn of Satan. Yet he rejoiced when he searched the lair. Amidst a pile of coins and jewels, he discovered a an exquisite, magical sword. Its marking revealed it to be the Sword of the Fisher King! Rudy also discovered a human tooth.When he picked it up, Rudy could feel a surge of holy power. Clearly it was a relic, perhaps the tooth of St. Oswald himself!

Sir Rudy was pleased with his successes. He could feel his prowess increasing. Yet he felt no nearer to the Holy Grail. Would he ever find it?

Find out in future episodes of Sir Rudy's Tale


Sunday, September 11, 2016

Sinister Sorcery

Another Knight of Destiny Adventure
Part 1 of Sir Rudy's Quest

Sir Rudy is another knight of Arthur's court that has taken on the Quest for the Holy Grail.

As he wandered through the countryside, he comforted a mortally wounded paladin and defeated a band of vicious dwarves. He then found an inn where he hired a merchant named Edric to manage his supplies.

He was about to leave the inn when a young, crying maiden ran up to him. She told Rudy how an evil wizard, Laamorz, had holed up in a nearby tower and was demanding tribute from the village. She heard a rumor that the wizard wanted her as the next tribute!

Incensed, Rudy pledged to end the wizard's reign of terror. He rode to the tower where he confronted Laamorz. The wizard just scowled and then launched a fireball at him! Rudy blocked it with its shield and then rushed his enemy. He managed to get in a few strikes, none fatal. Laamorz retreated to his tower with Rudy in hot pursuit. A fireball struck the paladin; Rudy could feel his skin cooking with the heat, but he did not relent. At the top of the tower, Rudy cornered Laamorz. He offered the wizard a chance to yield, but the magician launched another fireball. Rudy charged and put an end to Laamorz.


Tentacle, Tentacle, Tentacle

The Conclusion of A Can of Worms - A Kate and Kip Adventure

Kate and Kip's ambush worked. They defeated the worms and were able to move deeper into the sewers.

Finally, deep in the heart of the sewers, they discovered a large tentacled creature protected by worms and a slime.

The worms rushed them and spewed acid. Kate and Kip dodged, then blasted the worms.

The slime came racing at them but Kip blasted it.

Our heroes began moving into the room. Kip shot the tentacled thing. It retaliated by spitting a gob of acid that hit Kate. She cried out in pain as acid burned her flesh.

Nevertheless, she moved forward to the railing. This time, the monster missed. The diversion gave Kip a chance to move behind some cover.

The thing turned its attention on Kip. Fortunately he found cover; the acid splashed against the barrel. Kip returned fire and seared the creature.

Kate found cover and fired. Her shot missed. The thing spat at Kip; once again the barrel protected him. His return shot was accurate, blasting into the thing and finally killing it.

With the tentacled thing's demise, Stargaze City has been saved!

Saturday, September 10, 2016

Ambush!

Part 4 of A Can of Worms - A Kate and Kip Adventure


Driven back by a swarm of worms, Kate and Kip retreated to the pumping station and took up defensive positions. Given a brief respite, they treated their wounds, although Kate was still suffering.

One of the worms emerged. Kip missed but Kate blasted it!

A second emerged. This time Kip did not miss!

Then the third. Again, it was up to Kate to win the day!

The path is now open to the bowels of the sewers, wherein lays the heart of the mystery. What will they find there?

Tune in next time!

Saturday, August 27, 2016

Dungeon of Deception

A Four Against Darkness Adventure

After receiving reports of monsters issuing from an abandoned dungeon, the Temple has sent a neophyte paladin, Brother Bargor, to investigate. With him is an elf warrior, Edenil, whose tribe has been terrorized by the marauders.

Brother Bargor is armed with light armor, a shield, and sword.
Edenil has light armor, a sword, and a bow. Illustrations of his adventures show him with a shield, but that is artistic license.

Game note - To simplify my record-keeping, I played with only 2 characters. To help matters, I gave Brother Bargor a Healing scroll.

Our heroes entered the dungeon and proceeded to explore the right fork. The first few rooms were empty.

Game note - I used miniatures to record my progress. The "finished" map is shown below.
An overview of the dungeon
In the fourth room (4) they ran into a troll. Edenil quickly dispatched it. In the next room they discovered a minotaur. It bellowed with rage and charged them. Edenil dodged but Bargor was impaled on one of the creatures horns. He recovered and plunged his sword into the beast. Edenil followed with a slashing attack that opened a large wound in the minotaur. It panicked and fled. In its lair, our heroes found a Blessing scroll and jewelry worth 70 gp. After the battle, Bargor felt that this experience taught him a lesson and made him a better fighter (he leveled up).

In subsequent rooms, they found more treasure. Then they ran into an ogre (10). They attacked. Edenil hit it but Bargor missed. Off balance, he was unable to avoid the ogre's massive club. The blow crushed a couple of ribs and knocked him aside. He quickly recovered, however, and struck a telling blow. Edenil also attacked and struck. Furious, the ogre swung at Bargor. He dodged but the ogre's backswing struck Edenil! Despite the pain, he counterattacked and scored another hit. The creature swung again; this time Bargor took the brunt of it. Bruised and battered by the ogre, our heroes realized they had little stamina left. If the fight continued, they would succumb. Mustering their last reserves of strength they rushed to attack. Both the bladed buried themselves deep into the ogre's flesh. It collapsed in a pool of blood.

For all that effort, they only found 4 gold on the monster. Fortunately, they were able to heal, and continue their exploration.

In subsequent room (11, 14) they encountered and defeated vampire frogs. They discovered a strange puzzle (12) but they did not feel like they could solve it so they left it alone. By this time, they (actually me) were weary of adventuring so they began to backtrack. They passed an empty room (15) then defeated goblin swarmlings (16) and orcs (17) before making their way out of the dungeon.

While they did not find the main villain terrorizing the countryside, they managed to wipe out some powerful monsters and find some "donations" for the Temple.

Sunday, August 21, 2016

Creepy Crawly

Part 1 of the Search for Princess Zenobia
A Space Templar Adventure

Once again, Lord Malgore was up to his evil tricks. This time he captured Princess Zenobia of Vespa. She had been a leading voice on her planet for stronger ties with the Federation, putting a damper on Malgore's plans to create his own empire from the scattered systems of Fringe Space.

The Temple assigned our heroes, Rugen and his android sidekick TSD-95A ("Tee" for short), to search for and rescue the princess from Malgore's clutches.

The duo began their search on Vespa itself, a prosperous world in the heart of Fringe Space. They discovered the kidnappers former hideout. As they entered the building, they were attacked by a Protectron device, but were able to avoid harm and deactivate the security system. They found no clues at the hideout, but Vespian space traffic records were able to provide a suspected course for the escape ship.

Our heroes began following the trail. On a couple of different planets, they fell afoul of Imperial agents. Rugen was wounded but they learned that the kidnappers had previously had dealings with the Imperials. They felt they were hot on Malgore's trail!

Their clues led them to a seemingly deserted asteroid in an uninhabited system. Was there a secret base here? As they explored the surface, the planet's crust gave way, revealing a deep hole. Rugen began to fall but he grabbed the edge with his fingertips and managed to pull himself back up. Taking more care, they explored the gaping cavern and discovered a pocket of invaluable isotopium crystals. So that's why the criminals stopped here.

Next, Rugen and Tee tracked the kidnappers to another populated planet. As they were investigating another hideout, a large, many-legged vehicle rushed at them. It was a SPDR class battle walker! The walker began shooting laser bolts at them. Tee was hit, and the charge from the bolt shorted a number of his circuits. He fired back, damaged the craft. Rugen leapt upon it and thrust his laser sword into the vehicle's engine compartment. Flames and smoke began to issue from the walker. The pilot panicked and fled from the battle.

Once again, our heroes had defeated one of Malgore's minions, but where was Malgore and the Princess?

Tune in next time to find out!

Game Notes

  • This is a new adventure for my Space Templar heroes, Rugen and Tee. I realize that I never finished their previous adventure, but I wanted to move on. I guess we can assume they survived their prior encounter.
  • I'm playing this adventure using a variant of Ganesha Games' Four Against Darkness. I explain my tweaks on my Warwell's Wargames blog.

Friday, August 12, 2016

A Deadly Encounter

The Conclusion of Rowan's Quest

After defeating Agravaine, Owen assisted a wounded Sir Rowan to an inn, the Hungry Hare. Here, Rowan healed, hired another retainer (Harar the warrior), and learned more about the rebellion percolating in the land.

From the Hungry Hare, the party set out into the wilderness. They ran into a band of Pict raiders. The raiders surrounded the party and attacked. Rowan hacked and cleaved, cutting through the enemy. Alas, he was too late to help Owen, who fell to a Pictish blade. As Rowan buried his retainer, he wept for Owen's cruel fate. However, Rowan liberated an ornate box from the enemy. Within was a finger bone - clearly a relic! The raiders had probably stolen it from a nearby monastery.

Rowan and Harar rode until they came to another inn, the Friar's Rest. It was near the friary of St. Finieous, a local holy man from days of yore. After resting and healing, Rowan journeyed to the friary to return the relic. When he arrived he saw that the friars were burying some of their members and repairing buildings. Clearly the work of raiders. The friars were delighted that Rowan had the relic, which he learned was the finger of St. Finieous himself! The friars urged him to stay for the night. During dinner, Rowan mentioned that he was questing for the Holy Grail. When they heard, the friars decided to assist him in his quest by lending him St. Finieous's Finger.

Game note - I embellished the account greatly. Once I rolled up a relic as treasure, the story of the plundered friary leapt into my mind. When I rolled an inn for the next encounter, I knew it was the perfect way to introduce the friary. Ironically, the inn's name (Friar's Rest) was rolled randomly from the tables in KOD.

After their respite at St. Finieous's, Rowan and Harar continued their travels, undergoing a pilgrimage and finding more signs of rebellion along the way. Eventually, Rowan could no longer pay Harar, who went his own way. Thus, Rowan was alone when he faced his next challenge.

He was riding along when suddenly he was struck by a spear and knocked from his horse. He staggered back up, drew his sword, and assumed a defensive stance. He turned around and around, but could not spot his assailant.

"Who goes there who so uncouthly strikes an unaware knight?" Rowan challenged.

From behind him, very near by, he heard the sound of laughter.

""Tis I, Sir Garlon," a disembodied voice stated.

"Where? I see you not."

"Here, behind you!"

Rowan turned, only to be struck from the side by an unseen attacker.

"Or is it from here?"

Again, Rowan was struck. He realized that his opponent was invisible so he began watching the ground. He could see the grass and dirt disturbed by the passage of his foe. Using this knowledge, Rowan swung where he expected the enemy to be. He connected, and Garlon fell to the ground. Rowan followed up and began smacking the recreant knight. Garlon regained his feet. Now the two knights began battering each other. Soon, Rowan could hear the panting breath of his enemy. But blood was streaming from numerous wounds in his body, and his strength was leaving him.

Rowan figured that if he could get in 1 or 2 more good blows, he could possibly force his opponent to yield. With great exertion, he charged. Garlon sidestepped and tripped Rowan, who fell to the ground. Now, Garlon rushed to his fallen foe and began pummeling him. With Rowan nearly senseless, Garlon flipped him over and thrust a sword into a chink in Rowan's armor.

Thus fell one of the Grail Knights. R.I.P. Sir Rowan.

Finis

Game note - Ow, that was painful. For a while, that battle between Rowan and Garlon was even. With Garlon's poor morale, I hoped to force him to yield. However, Rowan started rolling poorly on defense went a number of rounds in a row where he missed Garlon but was wounded in return. Finally, it was too much and Rowan died. :(


Thursday, August 11, 2016

Dangerous Foes

Part 2 of Rowan's Quest
The second part of an adventure using Ganesha Games' The Knight of Destiny

After his night at the Black Griffin, Sir Rowan and his retainer Owen headed out into the wild wood. They spent the night camping out. At one point, they were beset by a pair of wild boars. Rowan made quick work of them and the duo enjoyed a nice meal of roast pork.

The next day, as they rode through the wood, they came upon a young damsel. Little did they know that it was actually the enchantress Morgana herself. She invited them to share a meal with her.in her pavilion. They accepted, and after a hearty repaste, they fell into a deep sleep. When they awoke, Morgana and her pavilion were gone. The duo had also lost all memory of the acts of rebellion about which they had previously learned. Clearly they had been the victims of sorcery.

Game note - per the encounter, Morgana used trickery to make Rowan lose 2 rumors that he had gathered. Rumors can be used to alter encounters.

After recovering from their sleep, Rowan and Owen continued into the wood. They reached a small clearing when suddenly a knight charged them. Rowan managed to block the attack but he hesitated to counterattack.

"Sir Agraivaine? "Tis I, Rowan, a knight of the Grail quest."

"Fool!" Agravaine replied, "I know thee, and I know that thou art a dead man. All the Grail knights shall die, and we shall have a new sire."

"Treason!" Rowan gasped. Before he could say more, Agravaine charged again. This time Rowan blocked the blow and struck back, wounding his foe.This happened two more times, the last knocking Agravaine from his steed. Gallantly, Rowan dismounted before resuming the fray. The rebel knight closed and struck. Rowan was momentarily stunned, allowing Agravaine to close and strike again with his main gauche, inflicting another wound on our hero. Again, the evil knight attacked and hit, but Rowan counterattacked and hit his foe. Rowan followed up and struck such a blow that Agravaine was knocked to his feet.

Rowan stood over Agravaine, sword at the ready, and called upon the recreant to yield.

"Never! Death to the supporters of Arthur!" hissed Agravaine as he rose and attacked. The pair traded blows but then Rowan took control of the fight. His flashing sword struck again and again, until it finally pierced through a chink in Agravaine's armor and penetrated through his black heart. Agravaine lay dead upon the turf.

Rowan had Owen bury the foe, but not before he recovered the Gem of Giramphiel, which provides magical protection from flame.

Game note - In KOD, it is possible to be challenged by named knights, in this case Agravaine. This was a long and bloody battle. I embellished the account for dramatic purposes. Agravaine had to check morale but he refused quarter and fought to the death.

Tuesday, August 9, 2016

Sir Rowan's Quest

Part 1 of Sir Rowan's Tale

The following tale is a report of an adventure played using Ganesha Games' The Knight of Destiny rules.


KOD is an adventure for a single character using the Four Against Darkness rules. A couple of things enticed me when I saw it: first is that it is set in Arthurian times, a favorite setting; second is that KOD introduces the paladin character class! Now on to the report.

Like many a knight at King Arthur's court, Sir Rowan had been inspired to quest for the Holy Grail. Astride his destrier, Rowan wandered the byways of olde England, searching for clues that will lead him to his objective. But this night he was resting comfortably at the Black Griffin Inn. As he lay back on the hay stuffed mattress he thought back over the events of the past few weeks.

His first inclination of trouble was when he came across a wounded knight lying in a field. Rowan rode over to him and tried to administer first aid, but alas his efforts were for naught. But before the knight passed, he croaked out a warning" "Beware, the baron is a traitor." Rowan would find other signs of impending rebellion: stories of black-clad recreant knights attacking the forces of the King, and signs of skirmishes along the path.

Game note: I rolled a Traitor's Attack encounter 5 times out of the first 8 turns! Something is definitely afoot!

At one point, as he was riding through the forest, Rowan was challenged by a band of outlaws. They demanded that he pay them a ransom but he refused. Instead, he demanded their surrender! They snickered at him and then unleashed a volley of arrows. But Rowan charged, smashing into a number of them and riding them down. The rest scattered deeper into the tangles of the forest.

A little further, Rowan came across a struggling village. The people there were clearly starving. They told tales of recreant knights and bandits stealing their crops. They sent a message to the King but their messenger never returned. They fretted that he was killed and the King had not learned of their plight. Taking pity on them, Rowan gave them some coin and promised to deliver a message on their behalf.

Game note - If Rowan offered 50 gp to the struggling village he would have earned a piety point. Alas, he only had 48 gp so no bonus. Still, I felt it would be in character if he offered something, even if there was no in-game benefit. Thus, Rowan split his fortune with the village.

After weeks of roaming, Rowan came to a crossroads with an inn, called the Black Griffin. Aiding the village set him back but he decided to splurge on a room and a meal. As he sat at the table, he noticed a group of ruffians bullying a young man. Rowan strode over to the group. At first, the ruffians challenged him. "What do you want?" snarled the ringleader, smacking a club into one palm. Rowan identified himself as one of Arthur's knights. The ruffians began to back away. The leader realized that he could not retreat without a loss of face. He raised his club in a threatening manner, but Rowan could see indecision in his eyes.

"Leave now." Rowan commanded. For a second, the man turned like he would flee. Then he turned back and attacked. With barely an effort, Rowan slashed his sword and sliced the club in twain. With this, the ringleader panicked and fled, followed by the rest of the ruffians.

Game note - I have greatly embellished this encounter.

Rowan turned back to the young man, barely out of boyhood. The youth identified himself as Owen and offered his services to the knight. He claimed to be able to take care of horses, weapons, and armor. Furthermore, he was good at finding things. For example, he told Rowan how a local baron was secretly plotting against Arthur. Impressed by the youth's knowledge, Rowan hired the young man.

As Rowan nodded off, he realized that his quest had not been full of high adventure and rousing tales of battles against recreant knights and monsters. Yet he was on the trail of something more perilous - a plot against the King. He wondered what tomorrow would bring.

If you are also wondering, stay tuned for the next part of the adventure!

Wednesday, July 20, 2016

The Dragon's Lair

An Adventure using Four Against Darkness
Part 2

After defeating the ogre, our party backtracked to the second room extending from the corridor (11). We met some goblin snotlings, which Aganon defeated in one blow. We then entered a room with a statue of a warrior (12).


The statue's sword did not appear to be stone; it gleamed like silver. Kyda was so entranced that she touched the sword. The statue suddenly came to life and swung its sword at her! She dodged the blow and then struck it with her sword. Wynne rushed up and smashed it with her mace. Enraged, the statue swung at Wynne but she dodged. Aganon, Wynne, and I all hit it, then Kyda finished it off with a backstab.

Once it was defeated, the statue crumbled into bits. We still had the sword, which was silver. We estimated that it was worth 140 gold pieces.

We wound through another empty corridor (13) and entered a charnel house. Suddenly, the bones became animated. 8 skeletons attacked. In a fury of holy indignation against the undead, Wynne smashed the bones to bits (with some help from the rest of us).

We turned back and then entered another corridor (15). Ahead, we could see a room (16) and could hear the unmistakable sounds of breathing. This was it! We readied ourselves and marched forth, springing a trap in the corridor. Another boulder fell, hitting me again! Wynne rushed to me side after I fell. But then we could hear movement from the room. The creature in there was coming out! Wynne cast a quick heal on me, then resumed her position.

Suddenly, from the room came the roar of fire. Aganon and Kyda hit the floor, avoiding damage. Wynne and I were blistered. Our party then rushed into the dragon's lair. Aganon wounded it while I cast a lightning bolt that struck it square in the chest. The beast bellowed with rage, then slashed with its claws at Aganon. He avoided the blow and struck the dragon again. It reared back and spouted flame from its gullet once again. This time, everyone was scorched. Yet we fought on. Surrounding it, we struck and struck until it lay dead. We found some gold and a magic mace for Wynne!

After bandaging our wounds, we headed out. I noticed that the corridor outside of the dragon's lair (15) turned toward the entrance. We decided to proceed down it. A swarm of vampire bats attacked but we easily scattered them. We were in luck; the corridor connected to the entry room. We made it out safely!

We returned to Temple headquarter to report our victory.


Sunday, July 17, 2016

Descent into Darkness

An Adventure using Four Against Darkness
Part 1

From the Chronicles of Maudicor
From our headquarters at the main Temple in Scotsile, servants of our Lord are often sent on missions across the divided lands. Recently, my party embarked on such a mission. The Temple received reports of dragon activity in the mountains north of Elgram.

My comrades and I were assigned to investigate. We tracked the dragon to a lair cut into the side of the mountain. Below is my map of the complex.

We could see an exit further up the mountain (clearly the way that the dragon made its way into the dungeon) but we entered through 2 large stone doors. Initially, we only encountered various types of vermin, such as vampire bats and frogs (1-3). We found an armory (4) but needed no weapons. A fountain (5) provided magical healing but we were as of yet unhurt.

After brushing aside some more vermin (6-7), we entered a room with a long entrance corridor (8). In the room itself, we could see a treasure chest. Carelessly, we entered, triggering a trap. A large boulder fell from the ceiling. The others managed to dodge it, but it glanced off my shoulder. I could feel pain surging through me. Wynne bandaged me the best she could.

We backtracked and then proceeded along an empty, winding corridor (9). We entered another room (10) and discovered an ogre! We attacked the beast. I cast a lightning bolt that knocked it back. Aganon used the opportunity to strike, causing another wound to the monster. The ogre lashed back and Aganon staggered. But he returned to the fray and struck the ogre again. Wynne followed and smashed it with her mace.

Now, the beast plowed through the party and swung at me! I could not avoid the blow and was sent reeling across the floor. Seeing me incapacitated, Aganon rushed over and stood over me to protect me. The ogre swung his massive club but Aganon deflected the blow. He struck back while Kyda moved behind and stabbed the ogre from behind. It collapsed with a mighty thud.

After the battle, Wynne felt a surge of holy power; she knew that the Lord had blessed her by increasing her skill. We rummaged the room and I found a staff that casts fireballs.

From there we backtracked again, entering a second door in the winding corridor.

What will the party find in this room. Learn next time!

Saturday, June 4, 2016

Caves of the Kobold Slave Masters

A Cat Patrol Adventure

The Cat Patrol, a party comprising of Cooper the warrior, Thomasina the cleric, Ollie the halfling, Onyx the rogue, and Buster the elf (who is fairly new to the party), has been hired to rescue Elvynn the adventurer, Word has come that he has been enslaved by kobolds. Our heroes set out on their adventure.

SPOILER ALERT
This game report reveals details from the published module, Caves of the Kobold Slave-Masters. If you plan or are thinking about playing this module you probably don't want to read this report. Instead, you may want to read one of my other Four Against Darkness reports. To maintain some surprise, I have no replicated the map.

Cover from the Ganesha Games website
As the party entered the caves, a pervading sense of doom overwhelmed Cooper, Ollie, and Buster. With the coaxing of their comrades, they continued into the kobold's lair, although their effectiveness was likely to be impaired.

In the first room, they found a chained goblin, whom they freed and allowed to escape from the dungeon. Then the found a magical pool, avoided a magical noose trap, and discovered a clue and a scroll in a library, After these successes, they stumbled into the lair of a manticore. They rushed to the attack and scored a couple of hits. It lashed out with its tail; Cooper narrowly avoided being skewered by the poisonous barb. Then the rest of the party defeated the beast. In its lair, they discovered an 80 gold piece pendant.

After passing through 2 uneventful rooms, the heroes stumbled into an armory. They made short work of the 6 kobold guards. The next room held a troll. In a short but intense battle, Cooper was wounded and the troll killed. As our heroes relaxed after their victory, the troll sprung back to life and attacked. Again they killed it but it regenerated. Finally, Buster hacked it to pieces and it remained dead.

From here they entered a long cavern with a rushing stream bisecting it. A bridge covered with runes crossed the stream. Bravely, Ollie decided to attempt a crossing. As he did, the magical runes erupted into flame. Fortunately our halfling was dextrous enough to leap clear of danger. The rest of the party decided to try wading the stream. Onyx got caught up in the current and was painfully bashed up against some rocks. But he and the rest of the party managed to make it across.

On the far side of the cavern was 2 doors. They opened one and were attacked by a zombie dragon. It breathed a noxious gas upon the party; Cooper, Ollie, and Onyx were nearly overcome by the fumes. The party hacked and slashed and the creature. Desperately wounded, it flew away.

In the other room they found Elvynn chained to a wall. He was being whipped by several kobolds. Cooper and Thomasina led the attack, taking out 2 kobolds. One of the enemy lashed out with its whip, disarming Buster. Another four of the slave-masters fell to the blades of our heroes. Cooper and Thomasina managed to stave off the attacks of the remaining enemy. Then in a blink of an eye, the last of the kobolds were defeated.

Onyx managed to pick the locks on Elvynn's chains. Then, they led him out of the caverns and into freedom.

Although Elvynn had been rescued, the slave-masters were still at large. What will happen next to our heroes? Only time will tell, so be sure to stay tuned for more exciting adventures of the Cat Patrol.

Saturday, May 28, 2016

Into the Sewers

Part 3 of A Can of Worms - A Kate and Kip Adventure

Last time, the heroic sacrifice of 2 Federation troopers allowed Kate and Kip to reach the pumping station. There they found a ooze-covered tunnel that led into the bowels of the city.

Proceeding down, they entered a labyrinth of passageways. They could hear the rushing of water nearby.

They turned a corner and found themselves confronted by a worm and a couple of slimes. Kip blasted a slime but the worm spit acid on Kate, wounding her badly.

Kate retreated to escape the acidic attacks. Kip blasted another slime. However, more worms began to converge.

Kip was hit! With both of our heroes wounded, they decided to retreat up the tunnel and find a defensive position.

What happened next? Did they defeat the worms? Find out next time on
The Adventures of Kate and Kip!

Sunday, May 15, 2016

Mummy's Day

A Cat Patrol Adventure


In its first adventure, the Cat Patrol explored the right and middle passage of the dungeon. Flush with success at finding a piece of jewelry worth 150 gold, they decided to return to town, where they were able to updated their equipment (Cooper and Thomasina purchased heavy armor while Ollie acquired leather).

In addition, they added a party member. Buster is an elf, armed with leather armor, a bow, and sword.

Game Note: I know it's supposed to be FOUR against darkness, but the party is named after our cats and we now have 5 cats. We didn't want to leave Buster out (his picture still needs to be added). I compensated by adding 1 to each D6 when determining the number of enemies. I should also have added a life to bosses.

Because the party did not explore the left passage of the dungeon, they decided to return and finish the job.

Game Note: Per the rules, once a party leaves a dungeon then all the monsters are supposed to leave. I decided to ignore this rule because we never met a boss, leaving it feeling a bit anti-climatic. Also, we would be exploring a whole new area. I decided to take a little creative license, allowing us to "finish" the dungeon but making it like a brand new one.

Here is the second level of the dungeon


Re-entering the dungeon, the party veered left. The came to stairs going down. At the bottom, a corridor (1) branched three ways. This time, they started to the left. As they turned down a long corridor (2), the screeching of bats pierced their ears. Little Ollie leapt into the air and sliced 5 of them himself!

They opened a door to their left and entered a large room (3). There were 8 goblins but the party dispatched them easily.

They returned to the corridor and opened the door on the right. In this room (4) was a puzzle box. Onyx nearly sprung the trap but he managed to open the box and find a valuable gem (30 gp)!

In the next room (5) they found the prone form of a small dragon. They tried to creep past it but it awoke and demanded them to explain what they were doing. They were left speechless. Then the dragon decided to let them pass, for a price. Coughing up all their hard-won treasure, the party proceeded to a temple (6). Here Cooper received a blessing that would give him a bonus against the undead.

The party had reached a dead end; they had no choice but to go back through the dragon's room. Hopefully, their previous bribe would be sufficient. Alas, it wasn't and the dragon attacked. Cooper and Thomasina shielded the party with their shields. Thomasina managed 2 hits against the dragon. Then, when Onyx managed to sneak around and backstab it, the dragon had enough. It flew away through a secret shaft. The party recovered their bribe as well as additional treasure.

The heroes backtracked then entered a small room (7) with an ogre. Cooper was wounded in the melee but once again Thomasina proved invaluable, scoring 2 hits on the monster. As it received multiple wounds, it fled. Ollie discovered a ring of teleportation.

In the next room (8), invisible gremlins stole a number of items, including the party's magic items and some weapons. Ollie found himself unarmed! Unwilling to proceed, the party returned to the goblin room (3) and recovered some daggers.

After re-arming, the party continued their quest. Leaving the gremlin room, the party entered a long corridor (9), From the far end they heard shuffling and moaning. As they peered into the darkness, they spotted a mummy!

From http://www.aidedd.org/dnd/monstres.php?vo=mummy
At first, only Onyx managed to hit. Then after Cooper and Thomasina defended against attacks, the party slashed the mummy to ribbons! They found a healing potion.

Game Note: Oops! I allowed everyone to attack. This being a corridor, only the front rank + the bowman (Buster) should have attacked.

With the main boss defeated, the party decided to leave the dungeon. Before they could escape, they were attacked by skeletal rats. Both Thomasina and Ollie were wounded. The party then annihilated the rest. The path was open; they left the dungeon with bounteous treasure!

Game Note: This is another adventure using Ganesha Games' Four Against Darkness